SharePoint is a great product. In this article I will demonstrate this by creating a Web Part which acts like a container for normal ASP.NET User Controls (.ascx files). This makes it very easy to customize a portal page by adding normal ASP.NET User Controls to it.
UserControlContainer Web Part
The UserControlContainer Web Part is created using the Web Part Templates for Microsoft Visual Studio .NET. The real magic in the UserControlContrainer class happens in the CreateChildControls() method. In this method the User Control is loaded and added to the Controls collection. The RenderWebPart() method renders the User Control to the HtmlTextWriter.
using System.ComponentModel;
using System.Web.UI;
using System.Web.UI.WebControls;
using System.Xml.Serialization;
using Microsoft.SharePoint;
using Microsoft.SharePoint.Utilities;
using Microsoft.SharePoint.WebPartPages;
namespace ReflectionIT.SharePoint.WebParts
{
/// <summary>
/// Description for UserControlContainer.
/// </summary>
[DefaultProperty("Text"),
ToolboxData("<{0}:UserControlContainer runat=server></{0}:UserControlContainer>"),
XmlRoot(Namespace="ReflectionIT.SharePoint.WebParts")]
publicclass UserControlContainer : Microsoft.SharePoint.WebPartPages.WebPart
{
privateconststring defaultText="";
privatestring_userControl=defaultText;
private Control _control=null;
[Browsable(true),
Category("User Control"),
DefaultValue(defaultText),
WebPartStorage(Storage.Personal),
FriendlyName("User Control (.ascx)"),
Description("Path to the User Control (.ascx)")]
publicstring UserControl
{
get
{
return_userControl;
}
set
{
_userControl= value;
}
}
/// <summary>
/// This method gets the custom tool parts for this Web Part by overriding the
/// GetToolParts method of the WebPart base class. You must implement
/// custom tool parts in a separate class that derives from
/// Microsoft.SharePoint.WebPartPages.ToolPart.
/// </summary>
///<returns>An array of references to ToolPart objects.</returns>
publicoverride ToolPart[] GetToolParts(){
ToolPart[] toolparts=new ToolPart[3];
WebPartToolPart wptp= new WebPartToolPart();
CustomPropertyToolPart custom= new CustomPropertyToolPart();
toolparts[0]=custom;
toolparts[1]=wptp;
toolparts[2]=new CopyrightToolpart();
wptp.Expand(Microsoft.SharePoint.WebPartPages.WebPartToolPart.Categories.Appearance);
custom.Expand("User Control");
returntoolparts;
}
/// <summary>
/// Load the UserControl
/// </summary>
protectedoverridevoid CreateChildControls() {
base.CreateChildControls ();
try{
if(_userControl!= defaultText){
_control= this.Page.LoadControl(_userControl);
}else {
_control= new LiteralControl(string.Format("To link to content, <a href=\"javascript:MSOTlPn_ShowToolPaneWrapper('{0}','{1}','{2}');\">open the tool pane</a> and then type a URL in the Link text box.",1, 129,this.ID));
}
}catch(System.Exception ex){
_control= new LiteralControl(string.Format("<b>Error:</b> unable to load {0}<br /><b>Details:</b> {1}",_userControl,ex.Message));
}
if(_control!= null){
// Add to the Controls collection to support postback
this.Controls.Add(_control);
}
}
/// <summary>
/// Render this Web Part to the output parameter specified.
/// </summary>
/// <param name="output"> The HTML writer to write out to </param>
protectedoverridevoid RenderWebPart(HtmlTextWriter output)
{
EnsureChildControls();
if(_control!= null){
_control.RenderControl(output);
}
}
}
}
Installation
STSADM is a command line tool in SharePoint which can be used to install the Web Part package. A Web Part package is to be created in the form of a CAB file. You do this in Visual Studio.NET by adding the DWP file (C#'rs.. make sure your DPW file is marked as content file) and the DLL along with a third file, the manifest.xml (which is normally there if you started from the Web Part template) to the CAB file. The manifest will contain the registration of the safe control that needs to be done in the web.config.
I run STSADM using a little Install.bat file which looks like this:
Updates can now easily be done by recompiling your projects and simply double-clicking the install.bat file or for the C#'rs call it as a post-build event.
Sample User Control
I will demonstrate the usage of my web part using a simple Calculator user control which can be used to calculate the sum of two numbers. The control is just a normal UserControl which I created using Visual Studio.NET. I have copied the calculator.ascx file to a new folder called 'SharepointTestControls' in my portal, in my case c:\inetpub\DemoPortal\SharepointTestControls. I have placed the SharepointTestControls.dll which contains the compiled codebehind class in the 'bin' folder of my potal, in my case c:\inetpub\DemoPortal\bin.
< TABLE id = "Table1" cellSpacing = "1" cellPadding = "1" border = "0">
<TR>
<TD>A:</TD>
<TD>
<asp:TextBoxid="TextBoxA"runat="server"Width="80px"></asp:TextBox></TD>
</TR>
<TR>
<TD>B:</TD>
<TD>
<asp:TextBoxid="TextBoxB"runat="server"Width="80px"></asp:TextBox></TD>
</TR>
<TR>
<TD>
<asp:Button id="ButtonTotal"runat="server"Text="Total"Width="56px"></asp:Button></TD>
<TD>
<asp:TextBoxid="TextBoxTotal"runat="server"Width="80px"></asp:TextBox></TD>
</TR>
</TABLE>
{
using System;
using System.Data;
using System.Drawing;
using System.Web;
using System.Web.UI.WebControls;
using System.Web.UI.HtmlControls;
/// <summary>
/// Summary description for Calculator.
/// </summary>
public class Calculator : System.Web.UI.UserControl
{
protected System.Web.UI.WebControls.TextBox TextBoxA;
protected System.Web.UI.WebControls.TextBox TextBoxB;
protected System.Web.UI.WebControls.TextBox TextBoxTotal;
protected System.Web.UI.WebControls.Button ButtonTotal;
privatevoid Page_Load(objectsender, System.EventArgs e)
{
// Put user code to initialize the page here
}
#region Web Form Designer generated code
overrideprotectedvoid OnInit(EventArgs e)
{
//
// CODEGEN: This call is required by the ASP.NET Web Form Designer.
//
InitializeComponent();
base.OnInit(e);
}
/// <summary>
/// Required method for Designer support - do not modify
/// the contents of this method with the code editor.
/// </summary>
privatevoid InitializeComponent()
{
this.ButtonTotal.Click += new System.EventHandler(this.ButtonTotal_Click);
this.Load +=new System.EventHandler(this.Page_Load);
}
#endregion
privatevoid ButtonTotal_Click(objectsender, System.EventArgs e){
try{
TextBoxTotal.Text = (Convert.ToDouble(TextBoxA.Text) +
Convert.ToDouble(TextBoxB.Text)).ToString();
}catch(FormatException){
TextBoxTotal.Text = "NAN";
}
}
}
}
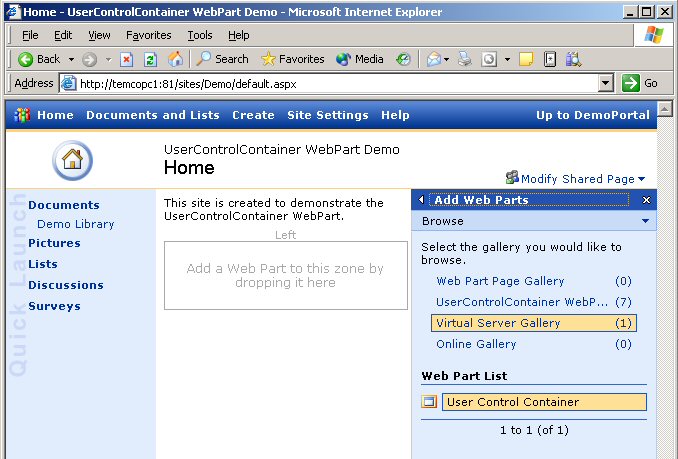
Using the Web Part
You can use the User Control Container Web Part by adding it to your page. In my example I have added it to the Left zone.
Next I have set the User Control property to '~\SharepointTestControls\Calculator.ascx' and changed the Title into 'Calculator'.
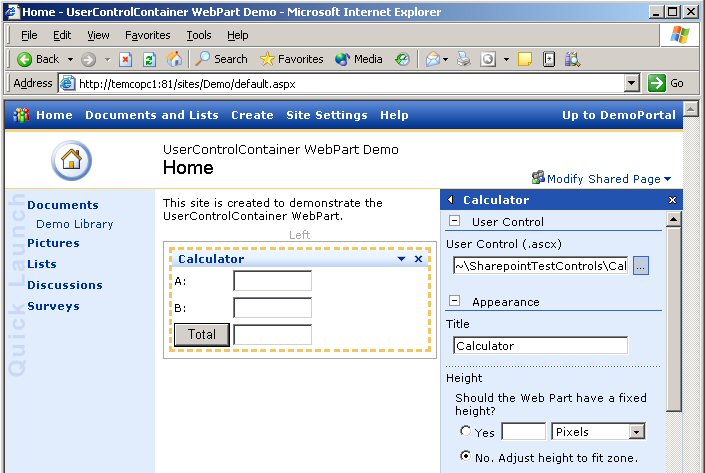
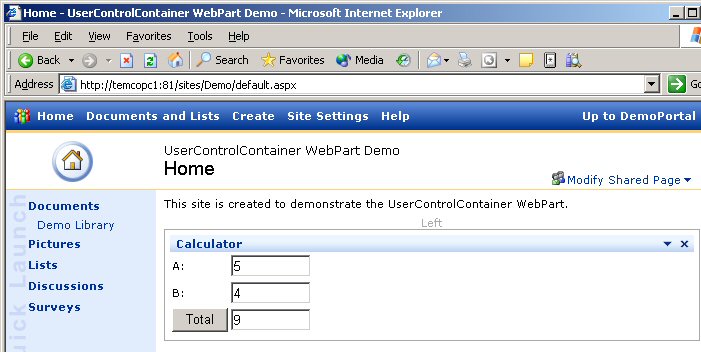
The Calculator UserControl now lives inside the UserControlContainer WebPart. When you enter two numeric values into textboxes 'A' and 'B' and click the 'Total' button you will see it really works.
Setting Custom Properties in DWP
I learned a trick from Mads Haugb?? Nissen which makes this WebPart even more powerfull. You can create an separate DWP file in which you predefine the value for the UserControl property. This way you don't have to set it manually.
<WebPart xmlns="http://schemas.microsoft.com/WebPart/v2" >
<Title>Calculator User Control</Title>
<Description>Calculator controlusedtodemonstratesettingcustom properties</Description>
<Assembly>ReflectionIT.SharePoint.WebParts</Assembly>
<TypeName>ReflectionIT.SharePoint.WebParts.UserControlContainer</TypeName>
<!-- Specify initial values for any additional base class or custom properties here. Don't forget the 'xmlns' attribute pointing to the XmlRoot namespace value of your WebPart. - ->
<UserControlxmlns="ReflectionIT.SharePoint.WebParts">~/SharepointTestControls/Calculator2.ascx</UserControl>
</WebPart>
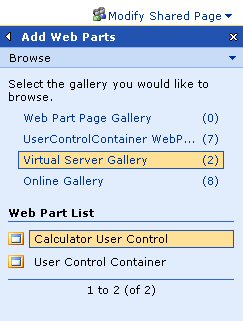
Finally you must copy the calculator.dwp file to the 'wpcatalog' folder of your portal, in my case c:\inetpub\DemoPortal\wpcatalog. The Virtual Server Gallery will show the Calculator User Control as if it was a normal WebPart. This makes creating WebParts very easy.
Related Reading
A Developer's Introduction to Web Parts
Packaging and Deploying Web Parts for Microsoft Windows SharePoint Services
Building Web Parts for Microsoft SharePoint Products and Technologies, Part I - The Basics
Building Web Parts for Microsoft SharePoint Products and Technologies, Part II - Web Parts and User Controls
Building Web Parts for Microsoft SharePoint Products and Technologies, Part III - Connectable Web Parts
Conclusion
Microsoft SharePoint Portal Server and Windows SharePoint Services is, in combination with the VS.NET and FrontPage 2003, an excellent development platform for building custom portal sites. I hope this article gave you an impression of how easy it is to add User Controls to a portal page.
Any suggestions and feedback for improving this article is most welcome. Send your suggestions and feedback to Fons.Sonnemans@reflectionit.nl
DownloadTags
SharePointAll postings/content on this blog are provided "AS IS" with no warranties, and confer no rights. All entries in this blog are my opinion and don't necessarily reflect the opinion of my employer or sponsors. The content on this site is licensed under a Creative Commons Attribution By license.

Blog comments
0 responses