In this blog post I will explain how you can show a message dialog and content dialog in your Windows 10 apps on the Desktop and Mobile (Phone) devices using C# and XAML. The MessageDialog class has been available in WinRT from the start. The ContentDialog class was introduced in Windows Phone 8.1 Universal apps and is now also available in Windows 10 because we now have a true Universal Windows Platform (UWP).
Sample Project
My sample project is a simple Windows 10 Universal app which I created using Visual Studio 2015 RC. It contains a Page with a StackPanel with 4 buttons. The first button will be used to show a message dialog. The other buttons will be used to show content dialogs.
<Page x:Class="ContentDialogDemo.MainPage"
      xmlns="http://schemas.microsoft.com/winfx/2006/xaml/presentation"
      xmlns:x="http://schemas.microsoft.com/winfx/2006/xaml"
      xmlns:local="using:ContentDialogDemo"
      xmlns:d="http://schemas.microsoft.com/expression/blend/2008"
      xmlns:mc="http://schemas.openxmlformats.org/markup-compatibility/2006"
      x:Name="pageRoot"
      mc:Ignorable="d">

    <Grid Background="{ThemeResource ApplicationPageBackgroundThemeBrush}">

        <StackPanel VerticalAlignment="Center"
                    HorizontalAlignment="Center">

            <Button Content="Show MessageDialog"
                    Click="ButtonShowMessageDialog_Click" />
            <Button Content="Show ContentDialog 1"
                    Click="ButtonShowContentDialog1_Click"
                    Margin="0,4" />
            <Button Content="Show ContentDialog 2"
                    Click="ButtonShowContentDialog2_Click" />
            <Button Content="Show ContentDialog 3"
                    Click="ButtonShowContentDialog3_Click"
                    Margin="0,4" />
        </StackPanel>

    </Grid>
</Page>
Show MessageDialog
The ButtonShowMessageDialog_Click method in the code behind of my page shows the message dialog. It creates an instance of the MessageDialog with the Text and the Title. UICommands are added to the Commands collection of the dialog. On Mobile you can only use 2 commands so there is a DeviceFamily check in the code to prevent the app from crashing. The DefaultCommandIndex is set to 0 which means that the first button will be invoked when you hit the Enter key. The CancelCommandIndex is set to 1 which means that the second button will be invoked when you hit the Escape key or the back button on the phone. You show the dialog using the ShowAsync() method which is awaited. The result contains the Id and the Label of the invoked command.
private async void ButtonShowMessageDialog_Click(object sender, RoutedEventArgs e) {

    var dialog = new Windows.UI.Popups.MessageDialog(
                "Aliquam laoreet magna sit amet mauris iaculis ornare. " +
                "Morbi iaculis augue vel elementum volutpat.",
                "Lorem Ipsum");

    dialog.Commands.Add(new Windows.UI.Popups.UICommand("Yes") { Id = 0 });
    dialog.Commands.Add(new Windows.UI.Popups.UICommand("No") { Id = 1 });

    if (Windows.System.Profile.AnalyticsInfo.VersionInfo.DeviceFamily != "Windows.Mobile") {
        // Adding a 3rd command will crash the app when running on Mobile !!!
        dialog.Commands.Add(new Windows.UI.Popups.UICommand("Maybe later") { Id = 2 });
    }

    dialog.DefaultCommandIndex = 0;
    dialog.CancelCommandIndex = 1;

    var result = await dialog.ShowAsync();

    var btn = sender as Button;
    btn.Content = $"Result: {result.Label} ({result.Id})";
}
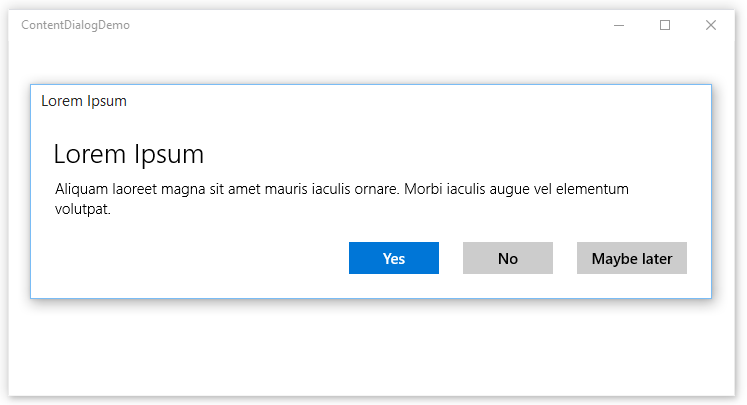
When you run the app on your computer and click/tap the first button you get a message dialog which is centered in the app window. The default button has a blue background which is the accent color of my computer.
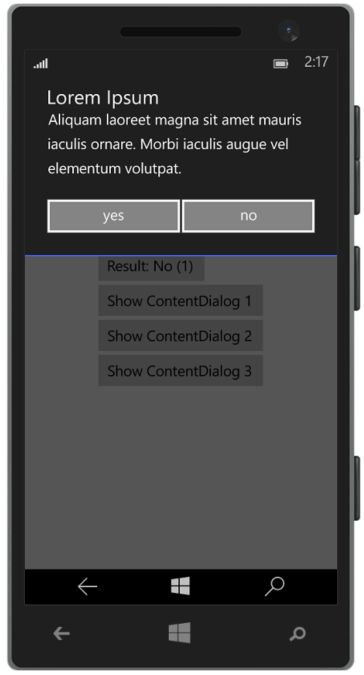
When you run the app on your Windows Phone and tap the first button you get a message dialog which is in the top of the screen. The dialog is dark because the phone has a dark theme setting. The labels of the buttons are always in lowercase.
Show ContentDialog
The ButtonShowContentDialog1_Click method in the code behind of my page shows the first content dialog. It creates an instance of the ConentDialog with the Title and MaxWidth. The MaxWidth property must be set to avoid problems with wide content on small devices. The Content of the dialog is set to StackPanel with the a TextBlock and a CheckBox. The IsChecked property is two-way databound to the IsPrimaryButtonEnabled property of the dialog. The Primary and Secondary buttons are initalized and use a Click event to set the result of the clicked button. If you use the Escape button or the back button on the phone the result will be set to NONE. You can only have one or two buttons.
private async void ButtonShowContentDialog1_Click(object sender, RoutedEventArgs e) {
    var btn = sender as Button;
    var dialog = new ContentDialog() {
        Title = "Lorem Ipsum",
        //RequestedTheme = ElementTheme.Dark,
        //FullSizeDesired = true,
        MaxWidth = this.ActualWidth // Required for Mobile!
    };

    // Setup Content
    var panel = new StackPanel();

    panel.Children.Add(new TextBlock {
        Text = "Aliquam laoreet magna sit amet mauris iaculis ornare. " +
                    "Morbi iaculis augue vel elementum volutpat.",
        TextWrapping = TextWrapping.Wrap,
    });

    var cb = new CheckBox {
        Content = "Agree"
    };

    cb.SetBinding(CheckBox.IsCheckedProperty, new Binding {
        Source = dialog,
        Path = new PropertyPath("IsPrimaryButtonEnabled"),
        Mode = BindingMode.TwoWay,
    });

    panel.Children.Add(cb);
    dialog.Content = panel;

    // Add Buttons
    dialog.PrimaryButtonText = "OK";
    dialog.IsPrimaryButtonEnabled = false;
    dialog.PrimaryButtonClick += delegate {
        btn.Content = "Result: OK";
    };

    dialog.SecondaryButtonText = "Cancel";
    dialog.SecondaryButtonClick += delegate {
        btn.Content = "Result: Cancel";
    };

    // Show Dialog
    var result = await dialog.ShowAsync();
    if (result == ContentDialogResult.None) {
        btn.Content = "Result: NONE";
    }
}
When you run the app on your computer and click/tap the second button you get a content dialog. The position of the dialog can differ depending the size of the app window. The OK button is only enabled when the checkbox is checked.

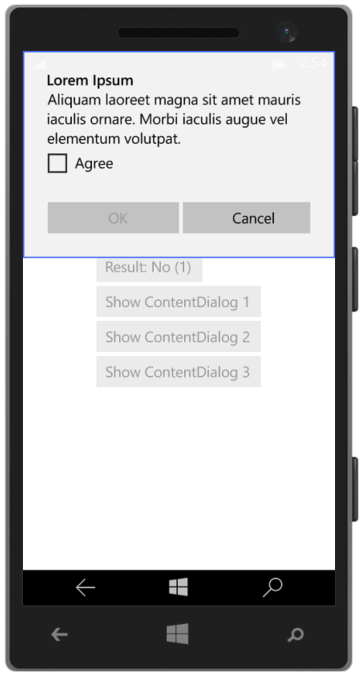
When you run the app on your Windows Phone and tap the second button you get a content dialog which is always in the top of the screen.
Show ContentDialog using Commands
The ButtonShowContentDialog2_Click method in the code behind of my page uses Commands instead of Events to show the result of the content dialog. The PrimaryButtonCommand is a RelayCommand which has a CanExecute which returns true when the checkbox is checked. I expected that this would disable the primary button but it doesn't. You will still have to databind the checkbox to the IsPrimaryButtonEnabled property. I hope this will change in future versions.
private async void ButtonShowContentDialog2_Click(object sender, RoutedEventArgs e) {
    var btn = sender as Button;
    var dialog = new ContentDialog() {
        Title = "Lorem Ipsum",
        //RequestedTheme = ElementTheme.Dark,
        //FullSizeDesired = true,
        MaxWidth = this.ActualWidth // Required for Mobile!
    };

    var panel = new StackPanel();

    panel.Children.Add(new TextBlock {
        Text = "Aliquam laoreet magna sit amet mauris iaculis ornare. " +
                "Morbi iaculis augue vel elementum volutpat.",
        TextWrapping = TextWrapping.Wrap,
    });

    var cb = new CheckBox {
        Content = "Agree"
    };
    panel.Children.Add(cb);
    dialog.Content = panel;

    // The CanExecute of the Command does not enable/disable the button :-(
    dialog.PrimaryButtonText = "OK";
    var cmd = new Common.RelayCommand(() => {
        btn.Content = "Result: OK";
    }, () => cb.IsChecked ?? false);

    dialog.PrimaryButtonCommand = cmd;

    dialog.SecondaryButtonText = "Cancel";
    dialog.SecondaryButtonCommand = new Common.RelayCommand(() => {
        btn.Content = "Result: Cancel";
    });

    cb.Click += delegate {
        cmd.RaiseCanExecuteChanged();
    };

    var result = await dialog.ShowAsync();
    if (result == ContentDialogResult.None) {
        btn.Content = "Result: NONE";
    }
}
Define ContentDialog in XAML
You can also use XAML instead of creating a content dialog from code. In the next example the ContentDialog is created in the MainPage.xaml and named MyContentDialog. The ButtonShowContentDialog3_Click method in the code behind will use this name to show the dialog and display the result.
<Page x:Class="ContentDialogDemo.MainPage"
      xmlns="http://schemas.microsoft.com/winfx/2006/xaml/presentation"
      xmlns:x="http://schemas.microsoft.com/winfx/2006/xaml"
      xmlns:local="using:ContentDialogDemo"
      xmlns:d="http://schemas.microsoft.com/expression/blend/2008"
      xmlns:mc="http://schemas.openxmlformats.org/markup-compatibility/2006"
      x:Name="pageRoot"
      mc:Ignorable="d">

    <Grid Background="{ThemeResource ApplicationPageBackgroundThemeBrush}">

        <StackPanel VerticalAlignment="Center"
                    HorizontalAlignment="Center">

            <Button Content="Show MessageDialog"
                    Click="ButtonShowMessageDialog_Click" />
            <Button Content="Show ContentDialog 1"
                    Click="ButtonShowContentDialog1_Click"
                    Margin="0,4" />
            <Button Content="Show ContentDialog 2"
                    Click="ButtonShowContentDialog2_Click" />
            <Button Content="Show ContentDialog 3"
                    Click="ButtonShowContentDialog3_Click"
                    Margin="0,4" />
        </StackPanel>

        <ContentDialog x:Name="MyContentDialog"
                        VerticalAlignment="Stretch"
                        Title="Lorem Ipsum"
                        PrimaryButtonText="OK"
                        IsPrimaryButtonEnabled="{Binding IsChecked, ElementName=checkBoxAgree, Mode=OneWay}"
                        SecondaryButtonText="Cancel"
                        MaxWidth="{Binding ActualWidth, ElementName=pageRoot}">
            <StackPanel>
                <TextBlock Text="Aliquam laoreet magna sit amet mauris iaculis ornare. Morbi iaculis augue vel elementum volutpat."
                            TextWrapping="Wrap" />
                <CheckBox x:Name="checkBoxAgree"
                            Content="Agree" />
            </StackPanel>

        </ContentDialog>
    </Grid>
</Page>
private async void ButtonShowContentDialog3_Click(object sender, RoutedEventArgs e) {
    var btn = sender as Button;
    var result = await MyContentDialog.ShowAsync();
    btn.Content = "Result: " + result;
}
Closure and download
I hope you can use this blog for your own Windows 10 apps. You can download the sample project below.
Cheers,
Fons
DownloadAll postings/content on this blog are provided "AS IS" with no warranties, and confer no rights. All entries in this blog are my opinion and don't necessarily reflect the opinion of my employer or sponsors. The content on this site is licensed under a Creative Commons Attribution By license.

Blog comments
vikrant Singh
16-Aug-2017 4:58Tony Henrique
21-May-2018 4:52Jol E. Roger
15-May-2020 11:57