Paging, sorting and filtering are common features in websites. Microsoft has written a tutorial how to implement these features in ASP.NET Core MVC with Entity Framework Core. The described solution works but I found it a bit too primitive. It triggered me to create a more powerful solution. Before you can start using my solution you should first read this tutorial, it explains how you can add Entity Framework Core to an ASP.NET Core MVC application.
Project Setup
My WebApplication is an ASP.NET Core Web Application (version 1.1) which uses EntityFramework Core 1.1. I use a commonly used Northwind SQL Server sample database which I created using the following tutorial. I have scaffold the Northwind database and created the controllers for the Suppliers and Products. Read this tutorial to learn how. I have added some extra navigation hyperlinks in the _Layout.cshtml file for the SuppliersController and ProductsController (Action Index).
The Index.cshtml file from the Views/Suppliers folder looks like this. I made some small adjustments like changing the h2 to an h1 and renaming the text 'Index' to 'Suppliers'. The most obvious change is that I removed some of the columns from the table to make it less wide.
@model IEnumerable<WebApplication8.Models.Database.Suppliers>

@{
    ViewData["Title"] = "Suppliers";
}

<h1>Suppliers</h1>

<p>
    <a asp-action="Create">Create New</a>
</p>
<table class="table table-striped">
    <thead>
        <tr>
            <th>
                @Html.DisplayNameFor(model => model.CompanyName)
            </th>
            <th>
                @Html.DisplayNameFor(model => model.ContactName)
            </th>
            <th>
                @Html.DisplayNameFor(model => model.Address)
            </th>
            <th>
                @Html.DisplayNameFor(model => model.City)
            </th>
            <th></th>
        </tr>
    </thead>
    <tbody>
        @foreach (var item in Model) {
            <tr>
                <td>
                    @Html.DisplayFor(modelItem => item.CompanyName)
                </td>
                <td>
                    @Html.DisplayFor(modelItem => item.ContactName)
                </td>
                <td>
                    @Html.DisplayFor(modelItem => item.Address)
                </td>
                <td>
                    @Html.DisplayFor(modelItem => item.City)
                </td>
                <td>
                    <a asp-action="Edit" asp-route-id="@item.SupplierId">Edit</a> |
                    <a asp-action="Details" asp-route-id="@item.SupplierId">Details</a> |
                    <a asp-action="Delete" asp-route-id="@item.SupplierId">Delete</a>
                </td>
            </tr>
        }
    </tbody>
</table>
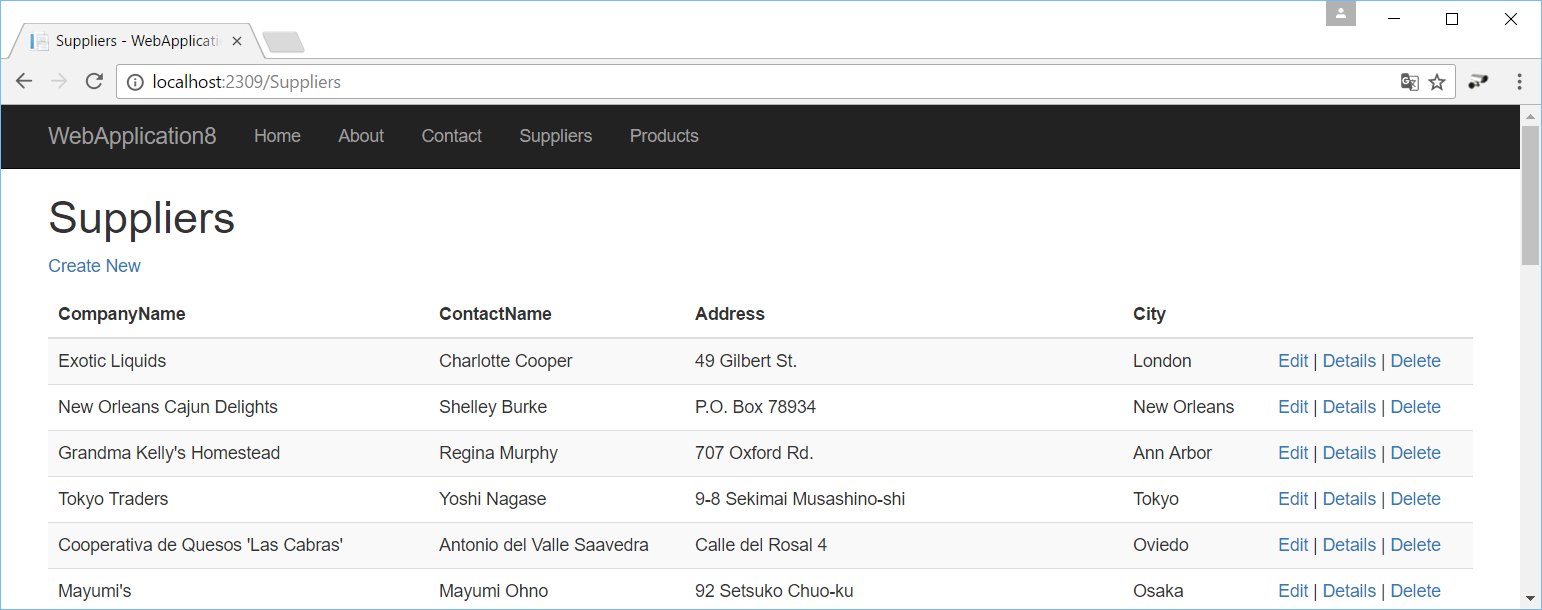
When you browse for the Suppliers Index page (http://localhost:2309/Suppliers) you get the following output. It shows you all suppliers and that list can be very long. Let's add Paging so we can limit the number of suppliers in the list.
Adding Paging
In the earlier mentioned tutorial a PaginatedList<T> class was used. My solution uses a similar approach but I named it PagingList<T>. This class and some other helper classes are packed in a NuGet package named ReflectionIT.Mvc.Paging. You can install the package using the NuGet browser in Visual Studio or by running the 'Install-Package ReflectionIT.Mvc.Paging' command from the Package Manager Console.
After installation you can add the paging services in the ConfigureServices() method of the Startup class. Add the services.AddPaging() call as shown below. This call will register an EmbeddedFileProvider which is used for rendering the View for the Pager ViewComponent. The View will be loaded from the ReflectionIT.Mvc.Paging assembly if it can not be found in your WebApplication.
public void ConfigureServices(IServiceCollection services)
{
    services.AddEntityFramework()
        .AddEntityFrameworkSqlServer()
        .AddDbContext<Models.Database.NorthwindContext>(options =>
            options.UseSqlServer(Configuration["Data:Northwind:ConnectionString"]));

    // Add framework services.
    services.AddMvc();

    services.AddPaging();
}
Next I modified the Index() method from the SuppliersController class. I added an optional 'page' parameter with the default value 1. I defined a query in which I retrieve the Suppliers from the context (NorthwindContext) with the AsNoTracking() method and an OrderBy(). The AsNoTracking() turns off change tracking which improves the performance. The OrderBy() is required to support Paging (Skip() & Take()) in EF. This query is used to create the PagingList. The page size is set to 10. This is the model which is passed to the View. The PagingList will fetch the data from the database asynchronously.
// GET: Suppliers
//public async Task<IActionResult> Index() {
//    return View(await _context.Suppliers.ToListAsync());
//}

public async Task<IActionResult> Index(int page = 1) {
    var qry = _context.Suppliers.AsNoTracking().OrderBy(p => p.CompanyName);
    var model = await PagingList.CreateAsync(qry, 10, page);
    return View(model);
}
The Index.cshtml view must also be modified. I changed the model type (line 1), added a using (line 2) and an addTagHelper (line 3). Lines 2 and 3 could also be moved to the _ViewImports.cshtml file which would add these lines to every view. I also added a Pager above the table. This is done by invoking the Pager View Component and passing the Model as the pagingList. It is placed inside a <nav> element with an aria-label which is used by screen readers. I have done the same below the <table> but there I used a new feature of ASP.NET Core 1.1. The View Component is invoked as a Tag Helper. It uses the <vc /> element and the class and parameters are translated to lower kebab case. For more info read this article.
@model ReflectionIT.Mvc.Paging.PagingList<WebApplication8.Models.Database.Suppliers>
@using ReflectionIT.Mvc.Paging
@addTagHelper *, ReflectionIT.Mvc.Paging

@{
    ViewData["Title"] = "Suppliers";
}

<h2>Suppliers</h2>

<nav aria-label="Suppliers navigation example">
    @await this.Component.InvokeAsync("Pager", new { pagingList = this.Model })
</nav>

<p>
    <a asp-action="Create">Create New</a>
</p>
<table class="table table-striped">
   ...
</table>

<nav aria-label="Suppliers navigation example">
    <vc:pager paging-list="@Model" />
</nav>
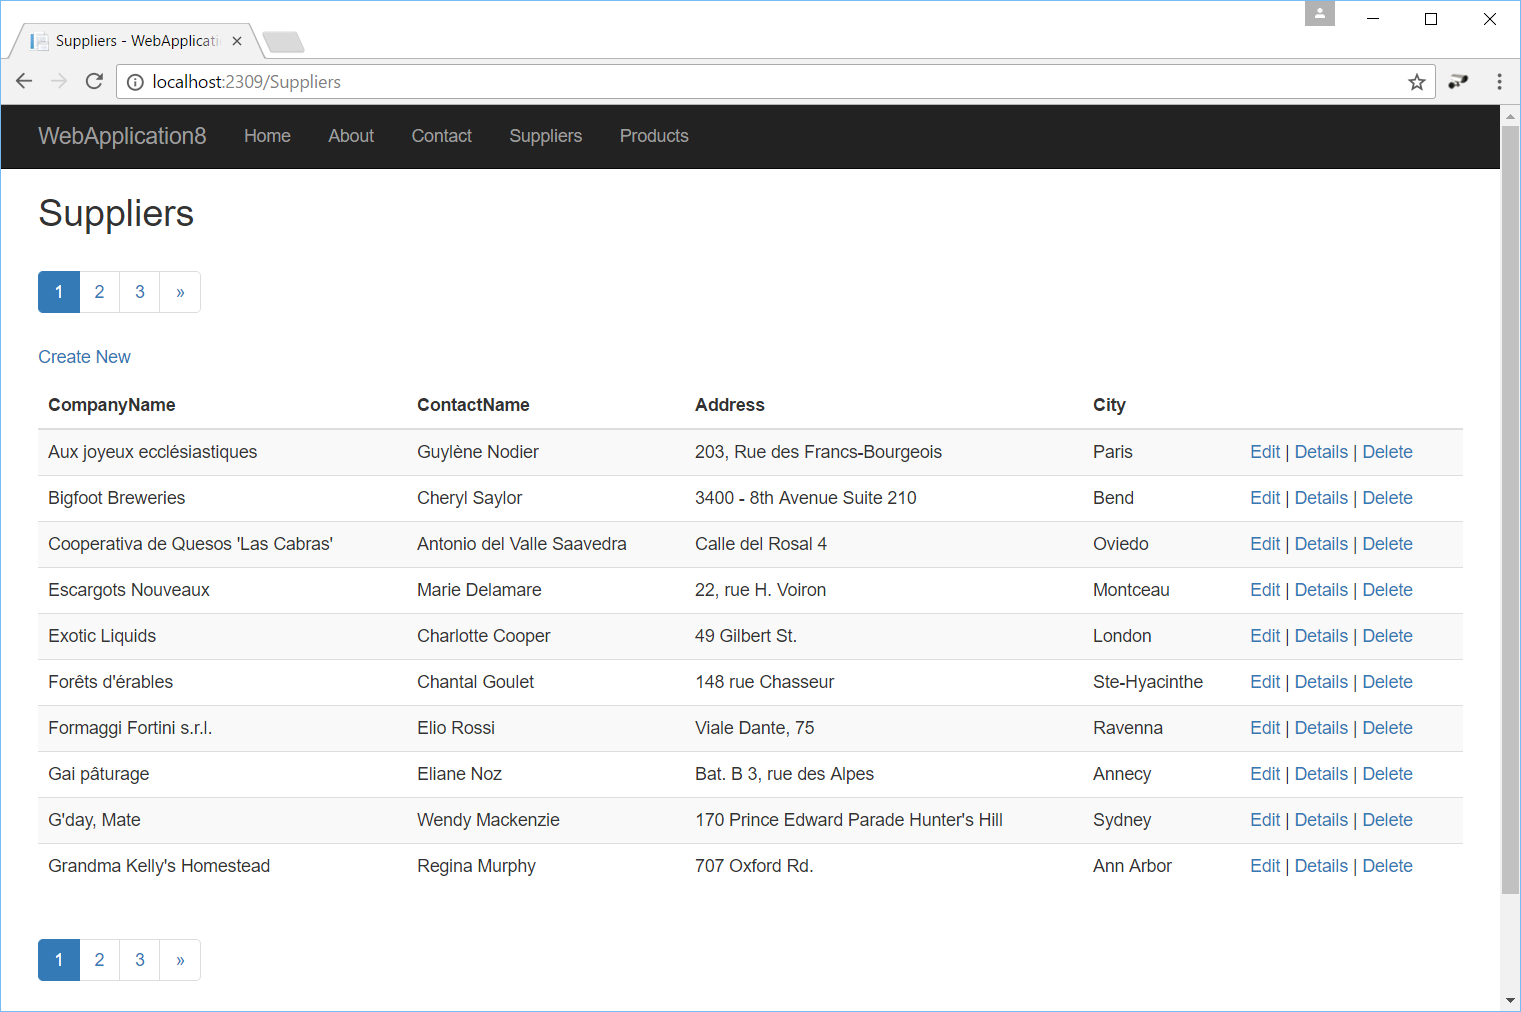
This results in the following view in which you see two pagers which use bootstrap markup.
Adding Sorting
For sorting I added an extra sortExpression parameter to the Index() method of the SuppliersController class. The parameter is optional and uses the CompanyName as the default sort expression in case none is supplied. The OrderBy() method is removed from the query because the PagingList will take care of the ordering. The sortExpression and the default sort expression are now required to create the PageList model.
public async Task<IActionResult> Index(int page = 1,
                                       string sortExpression = "CompanyName") {

    var qry = _context.Suppliers.AsNoTracking();
    var model = await PagingList.CreateAsync(
                            qry, 10, page, sortExpression, "CompanyName");
    return View(model);
}
In the View I modified the header of the table. I replaced the DisplayNameFor() calls by SortableHeaderFor() calls. I pass the Model as an extra parameter. This is not required but if you do you will get nice Up and Down indicators (glyphs) in the headers when you sort ascending or descending. You can also specify the SortColumn if you want a different one as the model property. In this example I used this for the City column. There I added the CompanyName as a second column to sort on.
<table class="table table-striped">
    <thead>
        <tr>
            <th>
                @Html.SortableHeaderFor(model => model.CompanyName, this.Model)
            </th>
            <th>
                @Html.SortableHeaderFor(model => model.ContactName, this.Model)
            </th>
            <th>
                @Html.SortableHeaderFor(model => model.Address, this.Model)
            </th>
            <th>
                @Html.SortableHeaderFor(model => model.City, "City, CompanyName", this.Model)
            </th>
            <th></th>
        </tr>
    </thead>
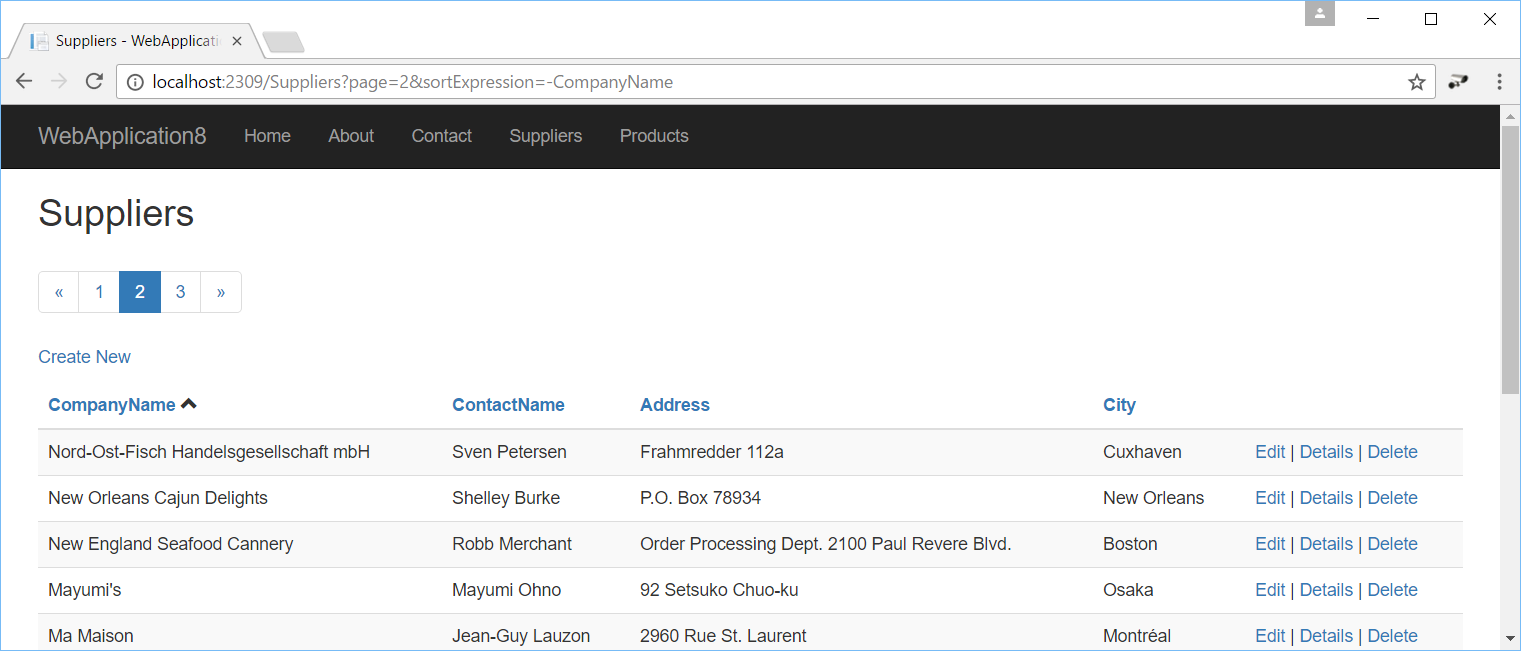
This results in the following view in which you can sort the table by clicking the headers of the columns. An up or down indicator shows you weather you are sorting ascending or descending.
Adding Filtering
To show filtering I will switch to the Products table, it has more records. The Index() method of the ProductsController has a filter parameter (besides page and sortExpression). The query is defined with an extra AsQueryable() method call. This method returns the the type IQueryable<Products>. This allowed me to append an extra Where "clause" to it when the filter is not empty. In this example I used a Contains() which translates to a like '%...%' condition.
You have to set the RouteValue property of the model with all conditions used in the filter. This is used to build the correct URL in the pager and table headers.
public async Task<IActionResult> Index(string filter, int page = 1,
                                       string sortExpression = "ProductName") {

    var qry = _context.Products.AsNoTracking()
        .Include(p => p.Category)
        .Include(p => p.Supplier)
        .AsQueryable();

    if (!string.IsNullOrWhiteSpace(filter)) {
        qry = qry.Where(p => p.ProductName.Contains(filter));
    }

    var model = await PagingList.CreateAsync(
                                 qry, 10, page, sortExpression, "ProductName");

    model.RouteValue = new RouteValueDictionary {
        { "filter", filter}
    };

    return View(model);
}
I added a form in the Index.cshtml with an input named filter and a submit button which has the method set to GET. This will execute the Index action of the controller.
@model ReflectionIT.Mvc.Paging.PagingList<WebApplication8.Models.Database.Products>
@using ReflectionIT.Mvc.Paging
@addTagHelper *, ReflectionIT.Mvc.Paging

@{
    ViewData["Title"] = "Products";
}

<h2>Products</h2>

<p>
    <a asp-action="Create">Create New</a>
</p>

<form method="get" class="form-inline">
    <input name="filter" class="form-control" placeholder="filter"
           value="@Model.RouteValue["Filter"]" />
    <button type="submit" class="btn btn-info">
        <span class="glyphicon glyphicon-search" aria-hidden="true"></span> Search
    </button>
</form>

<nav aria-label="Products navigation example">
    <vc:pager paging-list="@Model" />
</nav>

<table class="table table-striped">
    <thead>
        <tr>
            <th>
                @Html.SortableHeaderFor(model => model.ProductName, this.Model)
            </th>
            <th>
                @Html.SortableHeaderFor(model => model.Supplier.CompanyName,
                               "Supplier.CompanyName, ProductName", this.Model)
            </th>
            <th>
                @Html.SortableHeaderFor(model => model.Category.CategoryName,
                              "Category.CategoryName, ProductName", this.Model)
            </th>
            <th>
                @Html.SortableHeaderFor(model => model.UnitPrice, this.Model)
            </th>
            <th></th>
        </tr>
    </thead>
    <tbody>
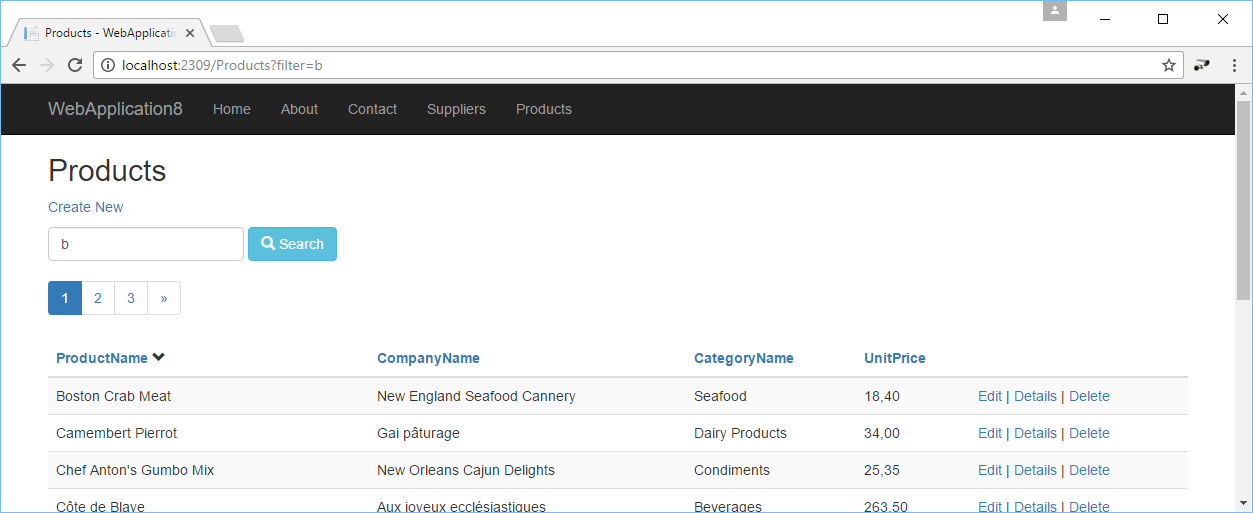
This results in the following view in which you can filter on ProductName and you have paging and sorting.
Customize
You can customize this solutions in a few ways. You can for instance call the AddPaging method which you can use to set the PagingOptions. This allows you to specify which View is used for the Pager ViewComponent. By default a pager based on Bootstrap3 is used. But there is also already a Bootstrap4 view available. Bootstrap4 doesn't support glyphs any more so if you switch to it you also have to specify alternatives for the Up/Down indicators used in the sortable headers of the table.
services.AddPaging(options => {
options.ViewName = "Bootstrap4";
options.HtmlIndicatorDown = " <span>↓</span>";
options.HtmlIndicatorUp = " <span>↑</span>";
});
You can also create your own Pager view if you want to. You store it in the folder Views\Shared\Components\Pager. The easiest way to create a custom view is by coping the default Bootstrap3.cshtml from Github. You can remove the Bootstrap classes and add your own or you can generate your own html buttons.
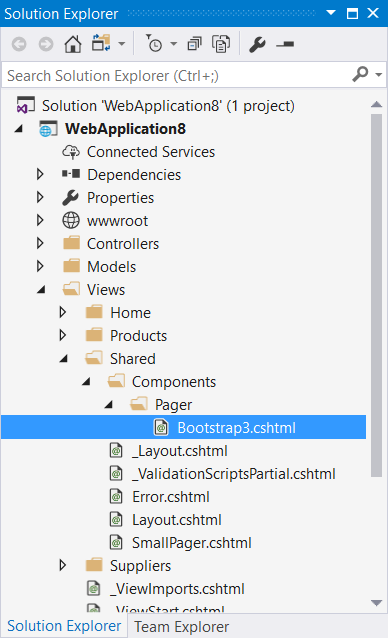
You can also render the Pager using the Html.Partial() Html Helper instead of using the Pager ViewComponent. The following snippet shows the 'SmallPager.cshtml' which I stored in the Views/Shared folder. When you store it in this folder you can access it from all views.
<nav aria-label="Products navigation example">
    @Html.Partial("SmallPager", this.Model)
</nav>
Closure
You can download my sample app using the Download button below. I have published the code of the Pager on GitHub. It also contains a sample webapp which uses Bootstrap4. It's open source. So if you create a better pager please do a pull-request.
Fons
Download
All postings/content on this blog are provided "AS IS" with no warranties, and confer no rights. All entries in this blog are my opinion and don't necessarily reflect the opinion of my employer or sponsors. The content on this site is licensed under a Creative Commons Attribution By license.


Blog comments
Tim Paque
20-Jul-2017 11:10Dipak Moliya
02-Aug-2017 10:45Mittal
01-Sep-2017 12:22Hoàng Nd
05-Sep-2017 5:33Michelle
06-Sep-2017 5:40Mohamed
05-Oct-2017 11:30pete timov
03-Nov-2017 1:57Jake
13-Nov-2017 5:40Mario
13-Dec-2017 6:21Anas
25-Dec-2017 7:56Amen
24-Jan-2018 11:28Sam
13-Feb-2018 4:52Antoin McCloskey
23-Feb-2018 1:44Andrew
24-Mar-2018 3:05Gabi Luca
06-Apr-2018 5:21Yuriy
22-Apr-2018 10:09Gareth
27-Apr-2018 1:57Gigios74
11-May-2018 5:40Ndubuisi
27-May-2018 11:57Jterhune
04-Jun-2018 4:19Olayinka Wasiu
08-Jun-2018 1:01Claudio Medina
25-Jul-2018 4:58Franco
03-Aug-2018 9:43Manuel
13-Aug-2018 12:41Manuel
13-Aug-2018 12:42Fabiano nalin
17-Aug-2018 2:59Aspal
24-Aug-2018 6:23gevorg
18-Sep-2018 1:55Joe
03-Oct-2018 2:13kübra
17-Oct-2018 4:13kübra
17-Oct-2018 4:13kübra
17-Oct-2018 4:13kübra
17-Oct-2018 4:13Kübra
01-Nov-2018 9:33Azam Ali
06-Nov-2018 9:39qalb
04-Dec-2018 10:12Michael Jacobs
29-Jan-2019 10:12Jarek
01-Mar-2019 11:09Moshiur Rahman
28-Mar-2019 7:38Elijah
06-Apr-2019 1:22Atalay
03-May-2019 1:41Atalay
04-May-2019 12:16shweta
17-Jun-2019 12:21Thanks
25-Jun-2019 3:24Amin
29-Aug-2019 6:17Andrew
30-Aug-2019 6:05lakshmi
07-Oct-2019 11:07Donprecious
27-Oct-2019 6:32Donprecious
27-Oct-2019 6:32Donprecious
27-Oct-2019 6:32Hosein
21-Dec-2019 7:10efe
29-Jan-2020 8:22Kinan Tassapehji
04-Mar-2020 12:38Igor
02-Apr-2020 10:24Alloylo
16-Apr-2020 2:12Athena Benge
07-Apr-2021 8:57sina
12-Jul-2021 5:27Алексей
18-Jul-2021 9:24Navid
15-Oct-2021 11:13Al-Hadi
07-Mar-2023 7:13