Besides Windows Phone and Windows 8 apps I develop Web sites using ASP.NET. In ASP.NET Web Forms you can define a MasterPage. This technique is called Layout pages in ASP.NET MVC. A simular technique can also be used in your Windows Store apps using XAML. In this blog I will explain how.
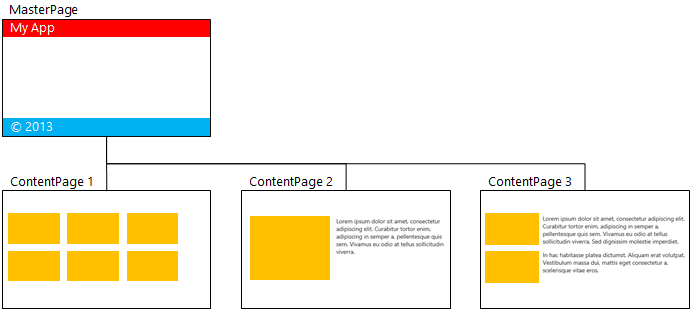
Master Page and Content Pages

In the example above all pages have a red header and a blue footer.
Master pages allow you to create a consistent layout for the pages in your application. A single master page defines the look and feel and standard behavior that you want for all of the pages (or a group of pages) in your application. You can then create individual content pages that contain the content you want to display. When users request the content pages, they merge with the master page to produce output that combines the layout of the master page with the content from the content page.

XAML MasterPage
I have created a Windows Store app using the 'Grid App (XAML)' template in Visual Studio. With this template you get a project in which 3 pages are predefined. These pages will be used as the content pages in my demo project.
Next I have added a Blank Page to my project named MasterPage.xaml. In this page I have added my header, footer and a Frame control.
<Page x:Class="MasterPageDemo.MasterPage"
      xmlns="http://schemas.microsoft.com/winfx/2006/xaml/presentation"
      xmlns:x="http://schemas.microsoft.com/winfx/2006/xaml"
      xmlns:local="using:MasterPageDemo"
      xmlns:d="http://schemas.microsoft.com/expression/blend/2008"
      xmlns:mc="http://schemas.openxmlformats.org/markup-compatibility/2006"
      mc:Ignorable="d">

    <Grid Background="{StaticResource ApplicationPageBackgroundThemeBrush}">

        <!-- Header -->
        <Rectangle Fill="#FF0000"
                   Height="130"
                   VerticalAlignment="Top" />

        <!-- Footer -->
        <Rectangle Fill="#00B0F0"
                   Height="30"
                   VerticalAlignment="Bottom" />

        <TextBlock Text="© 2013 Reflection IT"
                   VerticalAlignment="Bottom"
                   HorizontalAlignment="Left"
                   Foreground="White"
                   Margin="120,5"
                   FontSize="16" />

        <!-- Frame -->
        <Frame x:Name="frameBody" />
    </Grid>
</Page>
In the codebehind (MasterPage.xaml.cs) I have added a public property named ContentFrame which returns the Frame control.
namespace MasterPageDemo {
    /// <summary>
    /// An empty page that can be used on its own or navigated to within a Frame.
    /// </summary>
    public sealed partial class MasterPage : Page {
        public MasterPage() {
            this.InitializeComponent();
        }

        /// <summary>
        /// Invoked when this page is about to be displayed in a Frame.
        /// </summary>
        /// <param name="e">Event data that describes how this page was reached.  The Parameter
        /// property is typically used to configure the page.</param>
        protected override void OnNavigatedTo(NavigationEventArgs e) {
        }

        public Frame ContentFrame {
            get { return this.frameBody; }
        }
    }
}
Next I have modified the OnLaunched() method of the App.xaml.cs. In this method I have initialized the rootFrame with a MasterPage object instead of a Frame (line 9 and 18). Instead of using the Frame I now use the ContentFrame of the MasterPage for navigation (line 23, 39 and 45).
/// <summary>
/// Invoked when the application is launched normally by the end user.  Other entry points
/// will be used when the application is launched to open a specific file, to display
/// search results, and so forth.
/// </summary>
/// <param name="args">Details about the launch request and process.</param>
protected override async void OnLaunched(LaunchActivatedEventArgs args) {
    //Frame rootFrame = Window.Current.Content as Frame;
    var rootFrame = Window.Current.Content as MasterPage;

    // Do not repeat app initialization when the Window already has content,
    // just ensure that the window is active

    if (rootFrame == null) {
        // Create a Frame to act as the navigation context and navigate to the first page

        //rootFrame = new Frame();
        rootFrame = new MasterPage();

        //Associate the frame with a SuspensionManager key

        //SuspensionManager.RegisterFrame(rootFrame, "AppFrame");
        SuspensionManager.RegisterFrame(rootFrame.ContentFrame, "AppFrame");

        if (args.PreviousExecutionState == ApplicationExecutionState.Terminated) {
            // Restore the saved session state only when appropriate
            try {
                await SuspensionManager.RestoreAsync();
            } catch (SuspensionManagerException) {
                //Something went wrong restoring state.
                //Assume there is no state and continue
            }
        }

        // Place the frame in the current Window
        Window.Current.Content = rootFrame;
    }
    //if (rootFrame.Content == null)
    if (rootFrame.ContentFrame.Content == null) {
        // When the navigation stack isn't restored navigate to the first page,
        // configuring the new page by passing required information as a navigation
        // parameter

        //if (!rootFrame.Navigate(typeof(GroupedItemsPage), "AllGroups")) {
        if (!rootFrame.ContentFrame.Navigate(typeof(GroupedItemsPage), "AllGroups")) {
            throw new Exception("Failed to create initial page");
        }
    }
    // Ensure the current window is active
    Window.Current.Activate();
}
Finally I have removed the Background property from the LayoutRootStyle in the StandardStyles.xaml. This will make it transparent which allows you to view the content of the MasterPage.
<Style x:Key="LayoutRootStyle"
        TargetType="Panel">
    <!--<Setter Property="Background"
            Value="{StaticResource ApplicationPageBackgroundThemeBrush}" />-->
    <Setter Property="ChildrenTransitions">
        <Setter.Value>
            <TransitionCollection>
                <EntranceThemeTransition />
            </TransitionCollection>
        </Setter.Value>
    </Setter>
</Style>
I did some minor appearance changes like setting the RequestedTheme property of the Application (App.xaml) to "Light". I also changed the Foreground property of the PageHeaderTextStyle (StandardStyles.xaml) to "White".
Result
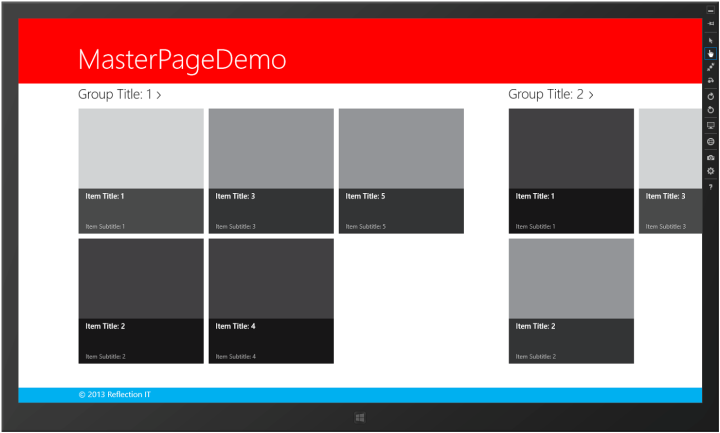
The result is an application in which all 3 content pages have the same header and footer.

Closure and download
I hope you like my solution. You can download my code below.
Cheers,
Fons
DownloadAll postings/content on this blog are provided "AS IS" with no warranties, and confer no rights. All entries in this blog are my opinion and don't necessarily reflect the opinion of my employer or sponsors. The content on this site is licensed under a Creative Commons Attribution By license.


Blog comments
Mark Moeykens
15-Apr-2013 3:01Ryan Rife
26-Dec-2013 9:44Vasu Mahesh
07-Sep-2014 4:27Ammar
20-Sep-2014 10:14Xlcnt
26-Nov-2014 3:03