I have used Visual States in XAML a lot. It all started in Silverlight, now I use it in my UWP apps. I often generate them in Blend for Visual Studio using recording. Blend used to generate Storyboards but with the current version generates Setters (UWP only). This is better, makes them easier to write and read. It is a bit buggy but I expect (hope) it will be fixed soon. A lot of developers are mistakenly not using Blend. They only use Visual Studio which doesn't support the great States feature of Blend. Writing the Visual States yourself can then be a lot of work.
To help those developers I have created an app called Xaml Diff. It generates the Visual State Setters using a diff analysis of your named elements in your XAML. It is free and you can download it from the Microsoft Store.
How to use
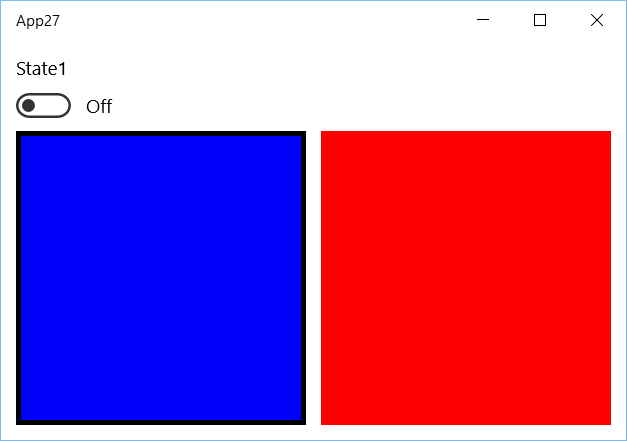
You start by designing or writing two versions of an XAML Page or UserControl. For this demo I have created a Page with a ToggleSwitch and two Rectangles. In the first version of the page the blue Rectangle is in Column 0 of my Grid and the red Rectangle in Column 1. Both Rectangles have an x:Name to allow them to be used in the Target property of the Setter.

<Page x:Class="App27.MainPage"
      xmlns="http://schemas.microsoft.com/winfx/2006/xaml/presentation"
      xmlns:x="http://schemas.microsoft.com/winfx/2006/xaml"
      xmlns:local="using:App27"
      xmlns:d="http://schemas.microsoft.com/expression/blend/2008"
      xmlns:mc="http://schemas.openxmlformats.org/markup-compatibility/2006"
      mc:Ignorable="d"
      Background="{ThemeResource ApplicationPageBackgroundThemeBrush}">

    <Grid Padding="12" ColumnSpacing="12" >
        <Grid.RowDefinitions>
            <RowDefinition Height="Auto" />
            <RowDefinition />
        </Grid.RowDefinitions>
        <Grid.ColumnDefinitions>
            <ColumnDefinition />
            <ColumnDefinition />
        </Grid.ColumnDefinitions>
        <Grid.ChildrenTransitions>
            <TransitionCollection>
                <ReorderThemeTransition />
            </TransitionCollection>
        </Grid.ChildrenTransitions>

        <ToggleSwitch Header="State1"
                      x:Name="toggleState"
                      VerticalAlignment="Top" />

        <Rectangle x:Name="rectangleBlue"
                   Grid.Row="1"
                   StrokeThickness="4"
                   Stroke="Black"
                   Fill="Blue" />

        <Rectangle x:Name="rectangleRed"
                   Grid.Row="1"
                   Grid.Column="1"
                   Fill="Red" />

    </Grid>
</Page>
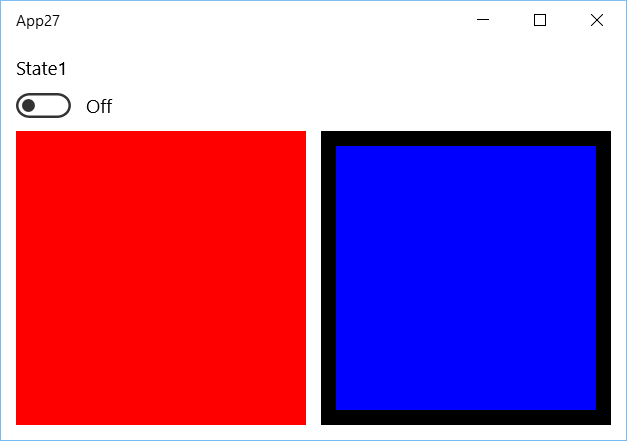
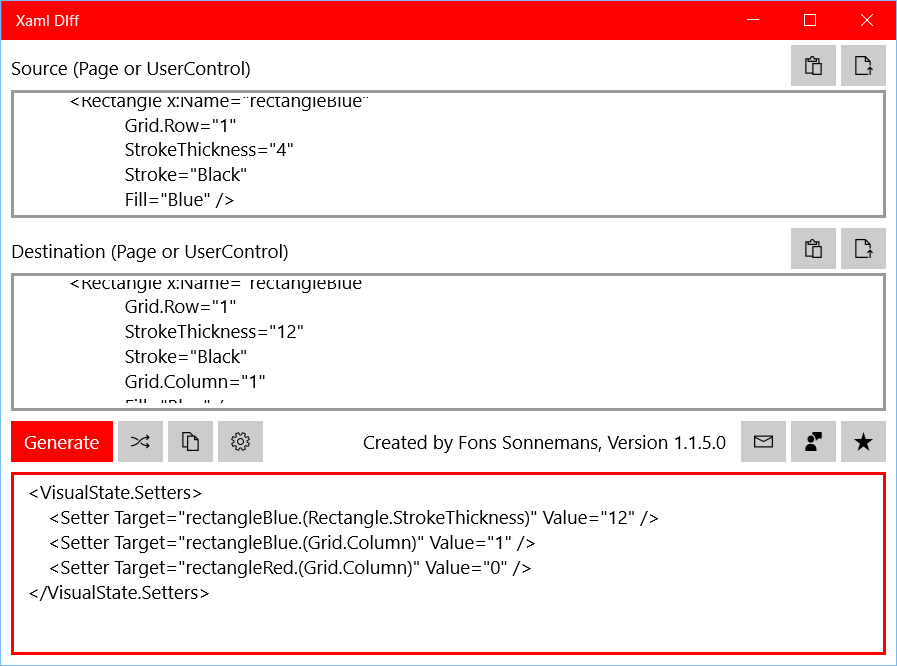
You Copy & Paste the XAML of the first version of the page into the Source textbox of Xaml Diff app. In the second version of my page I swapped the column of both rectangles. I also changed the StrokeThicknes of the blue rectangle to 12. This version will be converted to a Visual State.

<Page x:Class="App27.MainPage"
      xmlns="http://schemas.microsoft.com/winfx/2006/xaml/presentation"
      xmlns:x="http://schemas.microsoft.com/winfx/2006/xaml"
      xmlns:local="using:App27"
      xmlns:d="http://schemas.microsoft.com/expression/blend/2008"
      xmlns:mc="http://schemas.openxmlformats.org/markup-compatibility/2006"
      mc:Ignorable="d"
      Background="{ThemeResource ApplicationPageBackgroundThemeBrush}">

    <Grid Padding="12" ColumnSpacing="12" >

        <Grid.RowDefinitions>
            <RowDefinition Height="Auto" />
            <RowDefinition />
        </Grid.RowDefinitions>
        <Grid.ColumnDefinitions>
            <ColumnDefinition />
            <ColumnDefinition />
        </Grid.ColumnDefinitions>
        <Grid.ChildrenTransitions>
            <TransitionCollection>
                <ReorderThemeTransition />
            </TransitionCollection>
        </Grid.ChildrenTransitions>

        <ToggleSwitch Header="State1"
                      x:Name="toggleState"
                      VerticalAlignment="Top" />

        <Rectangle x:Name="rectangleBlue"
                   Grid.Row="1"
                   StrokeThickness="12"
                   Stroke="Black"
                   Grid.Column="1"
                   Fill="Blue" />

        <Rectangle x:Name="rectangleRed"
                   Grid.Row="1"
                   Fill="Red" />

    </Grid>
</Page>
You Copy & Paste the XAML of the second version of the page into the Destination textbox of Xaml Diff app. Now you can generate the Visual State Setters using the red Generate button. With the Swap button you can swap the Source & Destination. You can use the Copy button to copy it to the Clipboard.

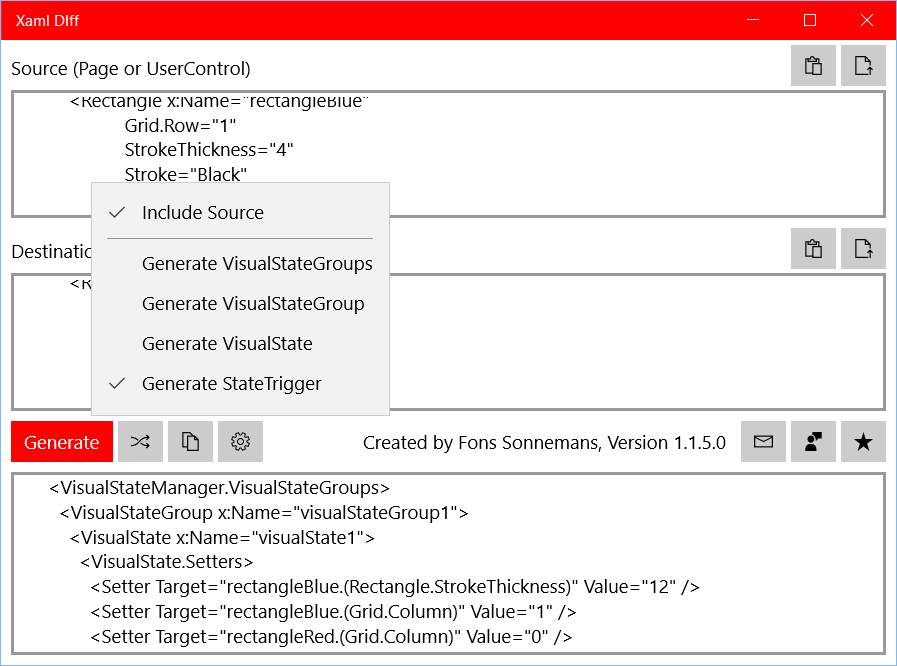
Using the Settings button, you have the options to include the Source in the Generated XAML. You can also add a VisualState.StateTrigger.

If you copy this generated XAML back into your IDE (Visual Studio or Blend) you only have to write the StateTrigger. In my case I data bind it to the ToggleSwitch.IsOn property, see line 15.
<VisualStateManager.VisualStateGroups>
    <VisualStateGroup x:Name="visualStateGroup1">
        <VisualState x:Name="visualState1">
            <VisualState.Setters>
                <Setter Target="rectangleBlue.(Rectangle.StrokeThickness)"
                        Value="12" />
                <Setter Target="rectangleBlue.(Grid.Column)"
                        Value="1" />
                <Setter Target="rectangleRed.(Grid.Column)"
                        Value="0" />
            </VisualState.Setters>
            <VisualState.StateTriggers>
                <StateTrigger IsActive="{x:Bind toggleState.IsOn, Mode=OneWay}" />
            </VisualState.StateTriggers>
        </VisualState>
    </VisualStateGroup>
</VisualStateManager.VisualStateGroups>
If you run the app and turn the ToggleSwitch on you will see the Rectangles swap column. This is animated because the Grid has a ReorderThemeTransition in the ChildrenTransitions.
Closure
I hope that the Xaml Diff can help you writing your Visual State Setters. It only works for UWP apps although Xamarin Forms 3.0 now has also Visual States support. Unfortunatly the implementation in Xamarin Forms is different. It uses Property and not Target in the Setters. Time/work for XAML Standard.
I'm open for suggestion to make this tool better. Use the Mail, Feedback or Rate buttons in the app.
Fons
All postings/content on this blog are provided "AS IS" with no warranties, and confer no rights. All entries in this blog are my opinion and don't necessarily reflect the opinion of my employer or sponsors. The content on this site is licensed under a Creative Commons Attribution By license.


Blog comments
Mike
13-Jul-2020 10:29